


Roof flashing might not be the first thing that comes to mind when thinking about roof construction or repair, but it plays an essential role in safeguarding your home. Properly understanding what roof flashing is and why it’s critical can save you a lot of trouble in the long run. Let’s delve deep into the world of roof flashing to equip you with all the knowledge you need.
Understanding Roof Flashing
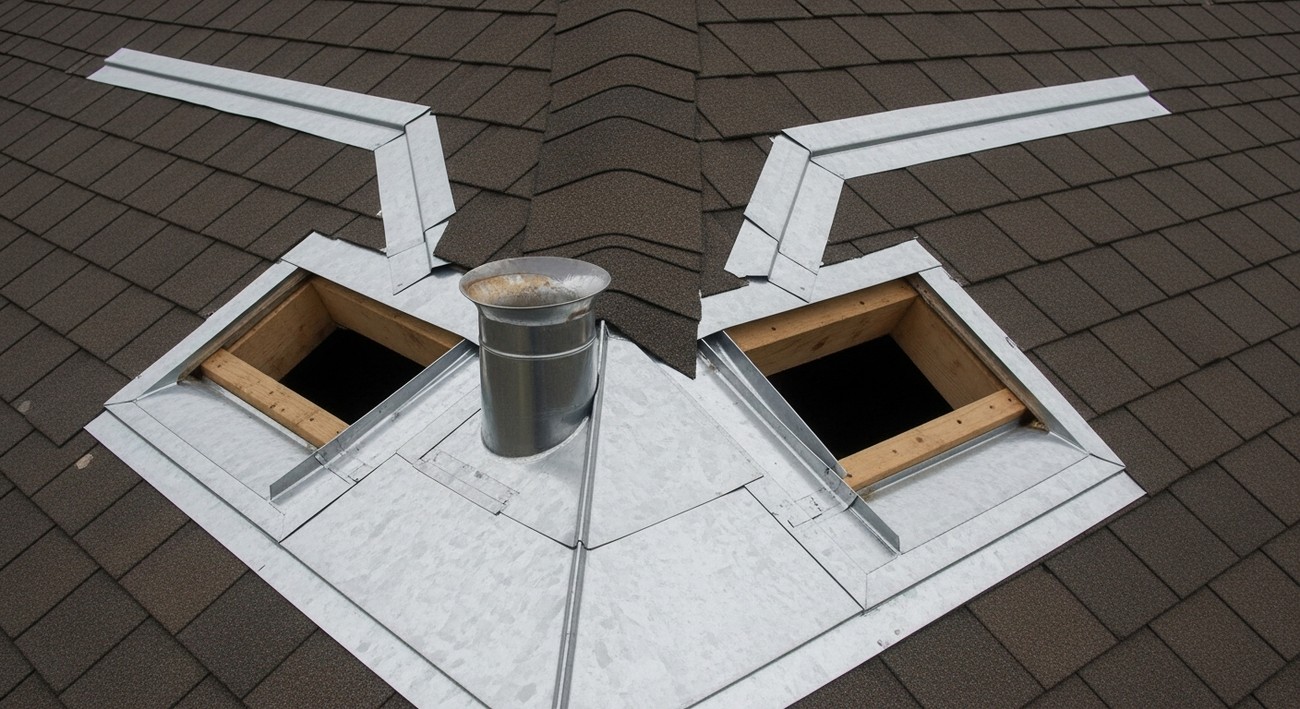
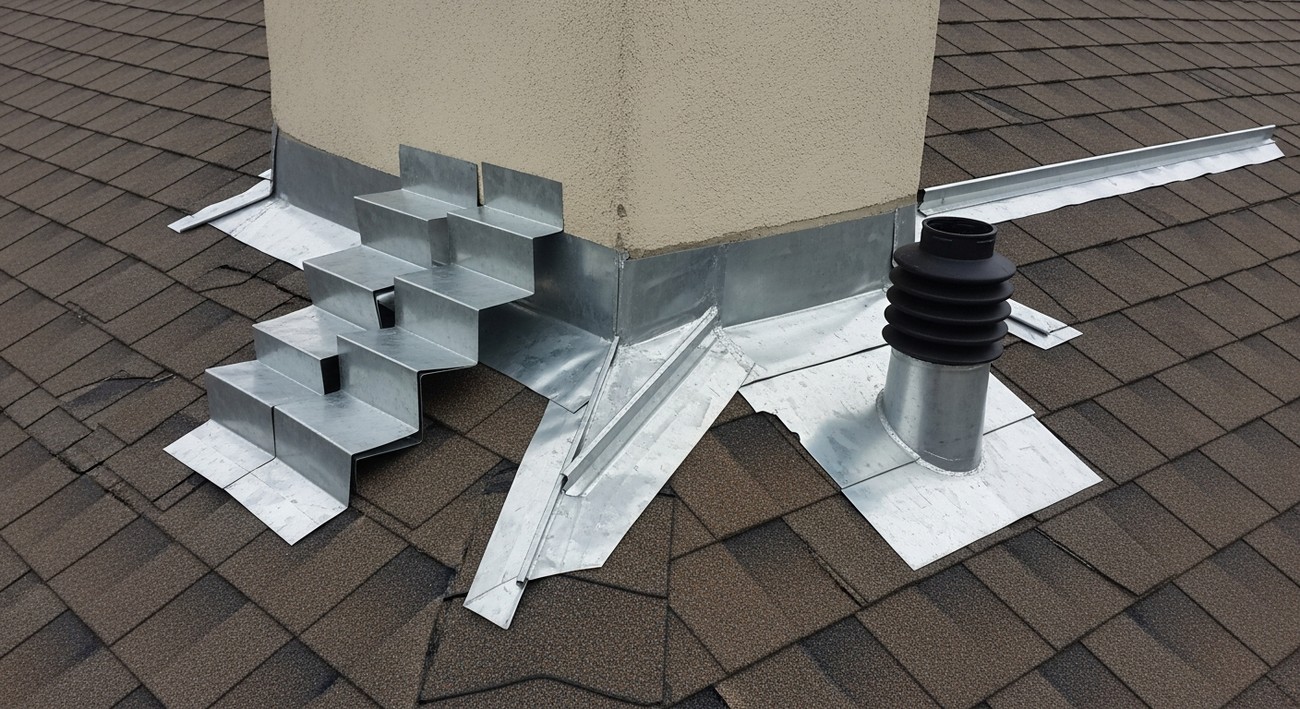
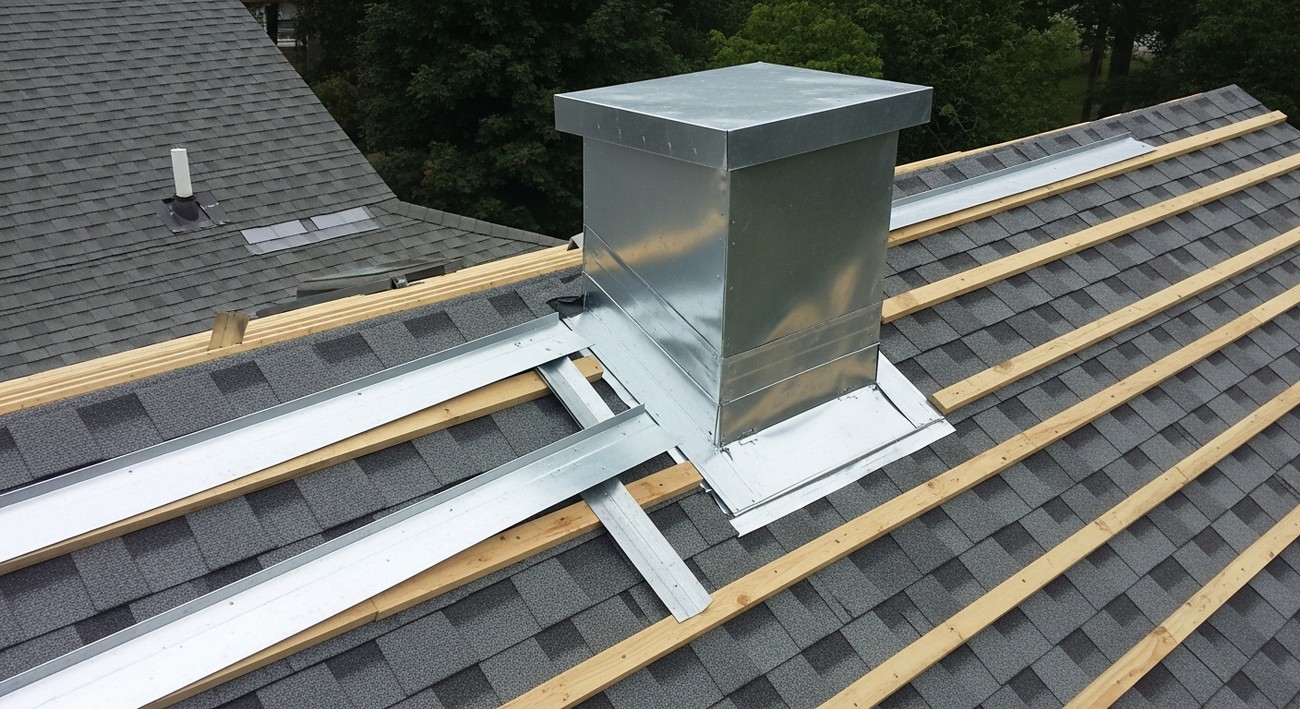
Roof flashing refers to thin material—often metal—that is installed to direct water away from critical areas of a roof, where the roof plane meets vertical surfaces such as walls or dormers. It's installed to prevent water from seeping into buildings, which can lead to water damage, mold growth, and structural issues. You'll commonly find roof flashing in valleys, around chimneys, skylights, vent pipes, and any protrusions on a roof.
Types of Roof Flashing
There are several types of roof flashing, each serving unique purposes and suitable for different roof areas:
Step Flashing
Step flashing is a rectangular piece of flashing bent at a 90-degree angle. It is often used where the edge of the roof meets a wall or chimney. This metal is installed in a step pattern, alternating with the shingles to create a tight barrier against water intrusion.Continuous Flashing
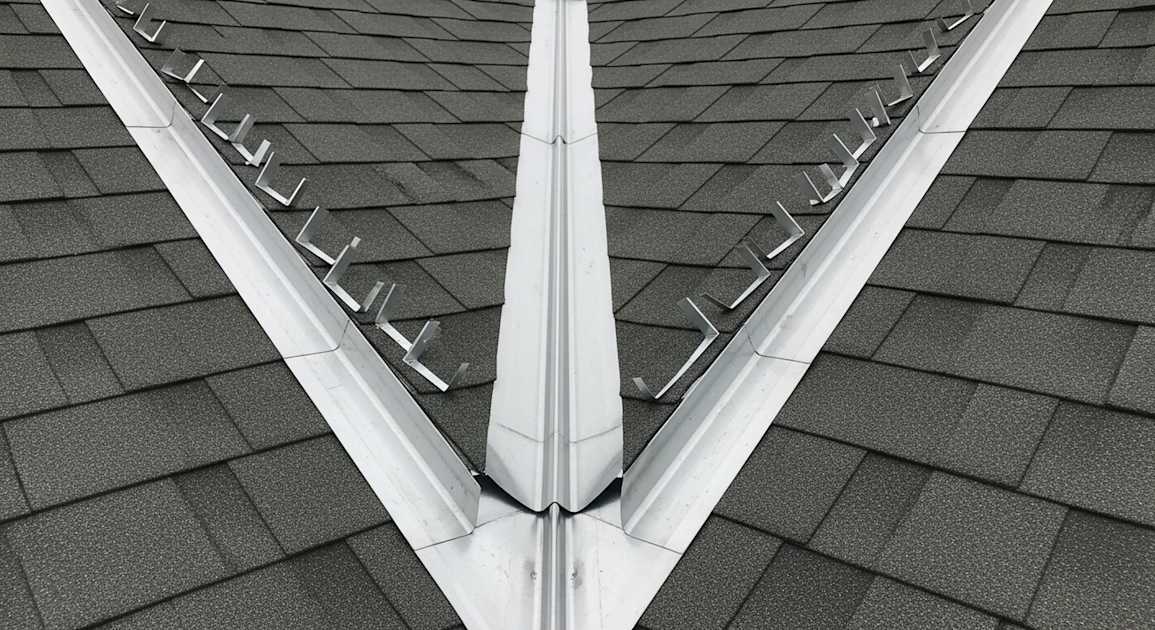
Continuous flashing, often referred to as “apron flashing,” is a long piece that carries water down to the roof whenever the roof plane continues up and against a vertical wall.Valley Flashing
This type is used in open valleys to protect this sensitive area from leaks. Valley flashing is usually pre-bent to conform to the valley and channels water away from the intersection of two roof planes.Drip Edge
Drip edges are installed at the edges of your roof to ensure water is directed away from the fascia and into the gutter. This type is particularly important to extend the life of your roof and maintain your home's curb appeal.Vent Pipe Flashing
Vent pipes require flashing to ensure a waterproof seal where pipes protrude through the roof. Typically, vent pipe flashing is a cone-shaped piece of flashing designed to snugly fit the pipe.
Materials Used in Roof Flashing
Roof flashing is available in various materials, each with their own specific benefits:
Aluminum
Aluminum is lightweight and somewhat easy to form, making it a popular choice for DIY installations. It’s also rust-resistant, which is beneficial in humid climates.Copper
Copper flashing is durable and can last longer than other materials. It’s ideal for homes where aesthetics are essential, as it develops a patina over time.Galvanized Steel
Known for its strength and durability, galvanized steel is a favorite among roofers, although it might not have the longevity of some other metals.Lead
Lead flashing is extremely durable and flexible. However, because it's toxic, it's becoming less popular, especially in residential settings.
How Roof Flashing Works
At its core, roof flashing is designed to keep water out of places where it shouldn’t be. When water is allowed to sit or pool against vulnerable parts of the roof, it can cause wood to rot, mold to develop, and ultimately lead to significant roof damage. Flashing acts as a physical barrier that channels water away from these vulnerable areas, aiding in the overall water-shedding system of your roof.
Roof flashing should always be installed under shingles and above joints to create a cascading effect that leads water down the roof. This installation ensures that water flows along the surface of the flashing, never underneath it.
The Installation Process
Installing roof flashing may seem simple, but it requires precision and expertise to ensure it functions correctly. Here’s a step-by-step look at how professionals typically install roof flashing:
Step 1: Prepare the Area
Clear the roofing surface of any debris and make sure the underlayment and shingles are appropriately installed in the area where the flashing will be placed.Step 2: Cut the Flashing
Measure and cut the flashing material to fit the specific area of installation, ensuring that it overlaps where necessary.Step 3: Install the Flashing
Position the flashing in the selected area; nail it down securely while taking care not to puncture areas where water flows.Step 4: Seal the Edges
Apply a waterproof sealant around the edges of the flashing to provide an additional barrier against water intrusion.
Common Issues and Solutions
Even with well-installed roof flashing, problems can arise over time. Regular maintenance and inspections are vital to prevent and address such issues promptly:
Issue: Corrosion of Metal Flashings
Solution: Regular inspections and applying a protective paint or sealant can prevent corrosion. Damaged sections should be replaced immediately.Issue: Loose Flashing
Solution: Secure any loose flashing components, and reapply sealant where needed to maintain a watertight seal.Issue: Improper Installation
Solution: It’s crucial to hire a skilled roofing professional to ensure flashing is installed correctly. An improper installation can lead to costly repairs.
FAQs About Roof Flashing
How does roof flashing protect my home?
Roof flashing acts as a crucial barrier to prevent water from seeping into your home. By directing water away from seams and joints on your roof, flashing helps maintain the integrity of your roof assembly, stopping leaks that could cause significant damage to the interior of your home. With its ability to guard against moisture infiltration, properly installed roof flashing ensures that precipitation is effectively diverted, safeguarding your home’s structure over time.
Where is roof flashing typically installed?
Roof flashing is typically installed around areas prone to water infiltration, like chimneys, skylights, vents, and valleys. These locations have seams and joints where sections of your roof come together, creating potential entry points for water. By installing roof flashing in these critical areas, you create a watertight seal that prevents leaks and reinforces the overall durability of your roofing system.
What materials are commonly used for roof flashing?
Common materials for roof flashing include aluminum, copper, stainless steel, and galvanized steel. Aluminum is popular due to its lightweight and corrosion-resistant properties, making it easy to install and long-lasting. Copper offers superior durability and an appealing aesthetic but comes at a higher cost. Stainless steel provides strength and resistance to extreme weather, while galvanized steel offers an effective and budget-friendly option with decent corrosion protection.
How often should roof flashing be inspected?
Regular roof flashing inspection is vital for ensuring its effectiveness and longevity. A good rule of thumb is to inspect your roof flashing at least twice a year, ideally during spring and fall. It’s also wise to check after major storms or any severe weather conditions, as flashing may have sustained damage during such events. Early detection allows you to address any issues promptly, preventing larger problems down the road.
Can I install roof flashing myself, or should I hire a professional?
While some DIY enthusiasts might feel capable of installing roof flashing themselves, it’s generally advisable to hire a professional. Roof flashing installation requires a detailed understanding of roofing structures and precision to ensure a watertight seal. Working with a professional ensures that the flashing is installed correctly, reducing the risk of costly water damage and prolonging the life of your roof.
What are the signs that roof flashing needs repair or replacement?
Indications that your roof flashing may need repair or replacement include visible rust, warping, bent pieces, or loose flashing. Water stains or leaks inside your home, especially near roof intersections, can also hint at flashing problems. If you notice any of these signs, it’s crucial to address the issue promptly to avoid further damage to your roofing and the interior of your home.
What is the difference between step flashing and counter flashing?
Step flashing and counter flashing are two types of roof flashing used for specific installation scenarios. Step flashing is typically used where the roof meets a vertical surface, such as a wall or chimney, in a stair-step pattern to direct water away. Counter flashing is applied over step flashing or embedded into a wall to provide an additional layer of protection, reinforcing the watertight seal. Both types work together to ensure effective water diversion.
Why is proper installation of roof flashing important?
Proper installation of roof flashing is critical to ensuring that water is effectively diverted away from vulnerable areas on your roof. Incorrectly installed flashing can result in leaks, mold growth, and structural damage to your home. Proper technique and attention to detail during installation maximize the lifespan and performance of the roof flashing, providing your roof and home with essential protection against the elements.
How long does roof flashing typically last?
The lifespan of roof flashing depends largely on the material used and the environmental conditions it is exposed to. Aluminum roof flashing, for instance, can last 20 to 30 years, while copper flashing may last upwards of 50 years. Regular maintenance and inspections can help extend the life of your flashing, ensuring it continues to protect your home effectively throughout its expected lifespan.
Common Myths and Misconceptions About Roof Flashing
Myth 1: Roof Flashing Is Optional
Details
Many homeowners mistakenly believe that roof flashing is merely an add-on, a sort of optional extra for your roof's longevity. In reality, roof flashing is a critical component that helps prevent water infiltration, which can lead to structural damage. Designed to direct water away from seams and joints, flashing prevents leaks that could otherwise lead to rot and mold, affecting both the integrity and safety of your home. Simply put, skipping on flashing is not a shortcut to savings, but a fast track to potentially expensive repairs down the line.
Myth 2: Flashing Only Protects Against Rainwater
Details
Some folks think that the main, if not the only, role of roof flashing is to ward off rain. While rainwater protection is a significant role, it’s not the sole function. Flashing is versatile, protecting against other moisture sources, such as melted snow and ice, which can refreeze and expand, causing material damage. Furthermore, flashing also guards against wind-driven water, which can be forced into seams and joints during heavy storms. It's a multifaceted defender, essential in almost any climate condition.
Myth 3: Flashing Material Doesn’t Matter
Details
The misconception that any material will do for flashing is a recipe for disaster. Different materials offer varying levels of durability, flexibility, and resistance to corrosion. Common elements like aluminum, copper, lead, and galvanized steel each have their pros and cons. Choosing the wrong type can lead to premature failure and additional costs. For instance, aluminum is cost-effective and easy to work with but may not be suitable for extreme salt-air exposure which can corrode it quickly. Understanding your environment and selecting the right material is crucial for maintaining a secure roof.
Myth 4: Flashing Is for Older Homes Only
Details
It might surprise some to learn that even brand-new homes need proper flashing. There's a romanticized notion that modern construction techniques and materials negate the necessity for flashing, but this is far from the truth. Regardless of how advanced a home's construction may be, transitions between roofing surfaces and any features that protrude through the roof need the added protection that flashing provides to prevent leaks. This myth likely stems from a misunderstanding of how roofs age, where the only contributing factor to leaks is deterioration rather than initial construction choices.
Myth 5: DIY Flashing Installation Is Easy and Reliable
Details
Some enthusiastic DIYers may believe that because flashing seems like a minor part of roof construction, installing it themselves will be a breeze. While many home improvement projects can be tackled with a can-do spirit and a couple of tutorial videos, flashing requires precise knowledge to install correctly. Missteps in the installation process—such as improper sealing or placing—can render the flashing ineffective and cause water infiltration. Professionals understand how to accommodate for thermal expansion and contraction, as well as the type of fasteners that won't rust over time, ensuring that the flashing functions optimally.
Myth 6: Flashing Costs Too Much
Details
Budget-conscious homeowners might balk at the perceived high cost of flashing, assuming that skimping here is a smart financial move. However, the initial expense of quality flashing and proper installation is a worthwhile investment when weighed against the potential costs of water damage repairs. Factors such as replacing rotting roof supports, repairing interior damage, and addressing mold or mildew problems, can far outweigh the up-front cost of having reliable flashing in place. Consider it insurance for your home’s structural health—which pays dividends in peace of mind and in protecting home value.
Myth 7: Flashing Maintenance Isn’t Necessary
Details
A common misconception is that once flashing is installed, it's a set-it-and-forget-it component. The reality is that flashing, like other parts of your roof, requires periodic inspection and maintenance to remain effective. Over time, flashing can corrode or become loose due to temperature changes or physical impact, such as falling debris or heavy winds. Regular roof inspections can reveal such issues early on, making it easier and cheaper to address them before they turn into leaks or more significant structural damages.
Final Thoughts
Understanding what is roof flashing is essential for any homeowner, as it plays a crucial role in protecting your home from water damage. Flashing effectively directs water away from critical areas, like chimneys and vent pipes, ensuring that your roof remains both functional and durable. Neglecting this important component can lead to leaks and costly repairs, so staying informed about its maintenance is vital.
If you're in Lexington, KY, and need assistance with your roof flashing or any other roofing concerns, we at US Quality Construction of Lexington are here to help. We invite you to reach out to us for a consultation or to request a free estimate. Our team is dedicated to providing quality service and expertise to ensure your home remains safe and secure for years to come.
Tags: roofs, construction, home improvement,


